DIY:W203 radiator R&R

 12-23-2005, 10:19 AM
#1
MBWorld Fanatic!
Thread Starter
Join Date: Jul 2005
Location: New York City
Posts: 7,424
Likes: 0
Received 3 Likes
on
2 Posts
C55 ///AMG, 535xi
DIY:W203 radiator R&R
I wanna change my radiator grille, any suggestions?? I did some searches but.... not much of a help 
I wanted to buy a new OEM one and chrome dip it but...
I wanted to buy a new OEM one and chrome dip it but...
 01-23-2006, 05:51 PM
#2
Newbie

Join Date: Nov 2005
Location: Los Angeles, CA
Posts: 7
Likes: 0
Received 0 Likes
on
0 Posts
2002 C240 STOCK!
Help! Transmission Oil Leaking from Radiator!
I noticed some oil in my driveway, it looks like the seals on the radiator are leaking the oil?? my car is out of warranty and only has 37k miles, whats the best way to go about this?

 01-23-2006, 10:26 PM
#6
MBWorld Fanatic!

The 'radiator' cools transmission fluid and engine water/coolant in different sections. Be thankful the leak isn't between the two sections....or isn't it? Either way, get radiator replaced now.
01-24-2006, 02:37 PM
#7
Newbie
Join Date: Nov 2005
Location: Los Angeles, CA
Posts: 7
Likes: 0
Received 0 Likes
on
0 Posts
2002 C240 STOCK!
just replaced the seal that was leaking, the seal only a around 2 dollars, and I changed it out my self. Need to go to the dealer and buy the tranny oil dipstick. Its funny how mercedes doesnt offer the car with a dipstick to check the fluid on these vehicles but you can buy it in the parts department for $47 dollars, by the way the service department charges $125 to check the oil level. These cars are Junk.
Trending Topics
06-19-2006, 09:44 AM
#8
Newbie

Join Date: Jun 2006
Location: Chicago
Posts: 1
Likes: 0
Received 0 Likes
on
0 Posts
C230K
Oil leak at radiator?
I've been driving my wife's C230K coupe recently while my car was off the road for a while. I've noticed a large oil patch under the car in our otherwise clean parking space. On inspection, the plastic tray under the engine was literally full of oil.
After degreasing everything and washing it off, I've isolated the leak to a metal oil pipe right at the front right of the radiator. It appears to be where the pipe joins the radiator (this is on the left if you're standing in front of the car looking at the engine and scratching your head). I took the little wire clip off the pipe and pulled the plastic ring out of the way, but even with a block of wood and a little persuasion, I couldn't get the pipe all the way out. I've since knocked it back in and put the clip back until I get a better idea of how it all fits together.
I'm thinking it's a push fit with an O-ring on a lip on the inside of the oil radiator which has probably started to disintegrate.
Has anyone else had a similar problem?
Does anyone know if I'm correct about how it all fits together?
Does anyone know how to fix it?
Matt T
Last edited by Guru of Warmth; 06-19-2006 at 02:33 PM.
01-28-2008, 01:09 AM
#9
Super Moderator
DIY: Radiator replacement
*specific to automatic transmission W203s*
Parts required:
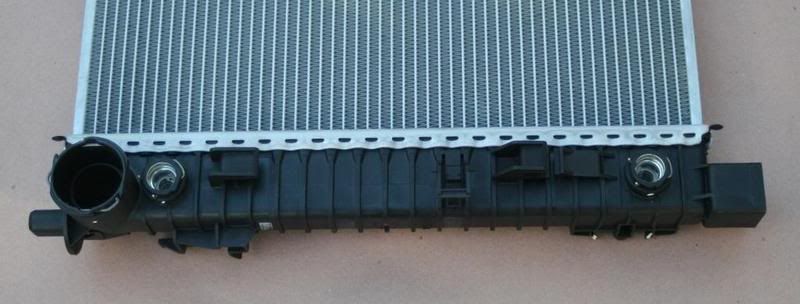
(1) 203 500 05 03 radiator
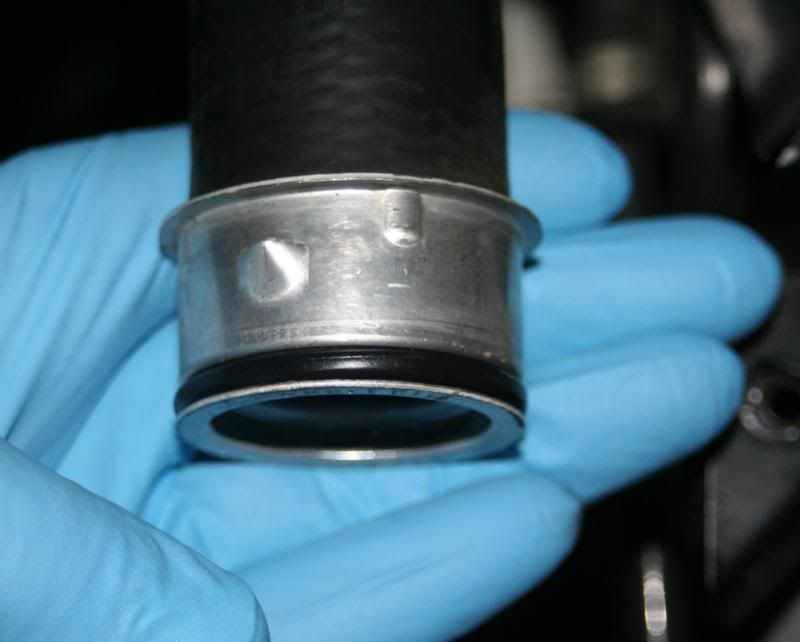
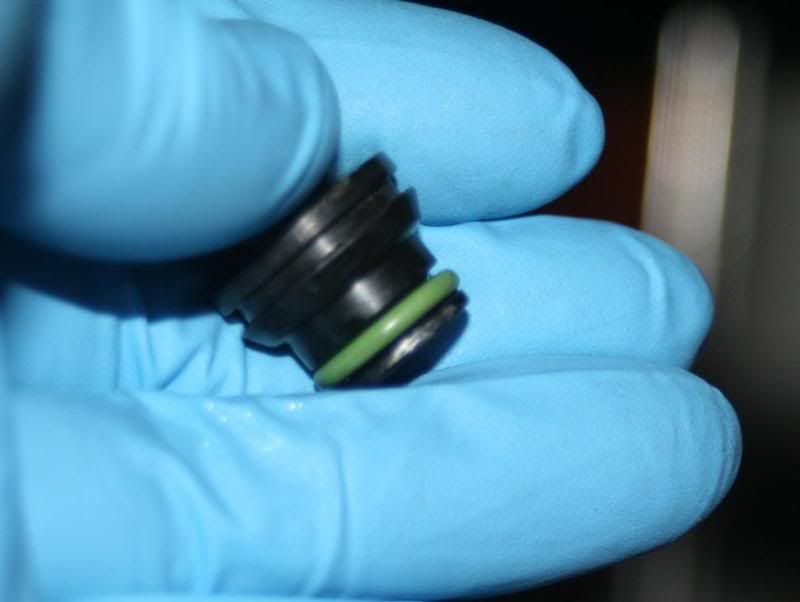
(2) 028 997 62 48 ATF tube seal
(2) 003 997 17 89 coolant hose seal
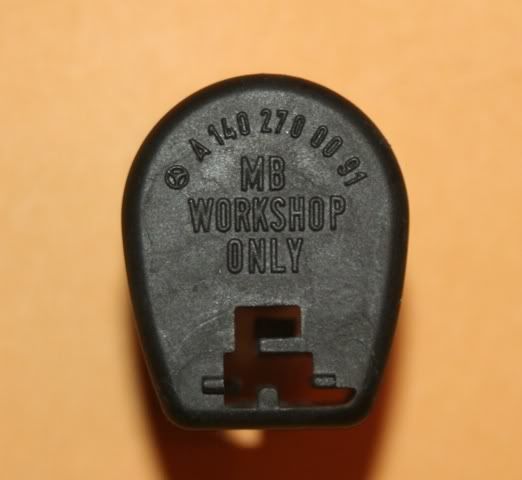
(1) 140 991 00 55 ATF cap lock pin
Consumables:
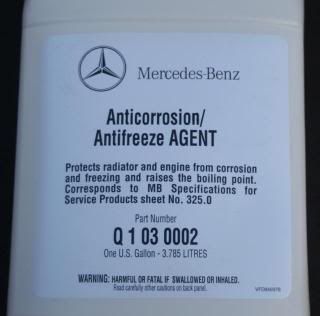
Q 1 03 0002 antifreeze
A 001 989 21 03 19 ATF
Distilled water
Specialty tools:
140 589 15 21 00 ATF dipstick
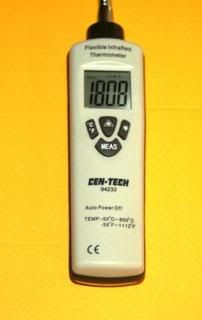
Infrared thermometer
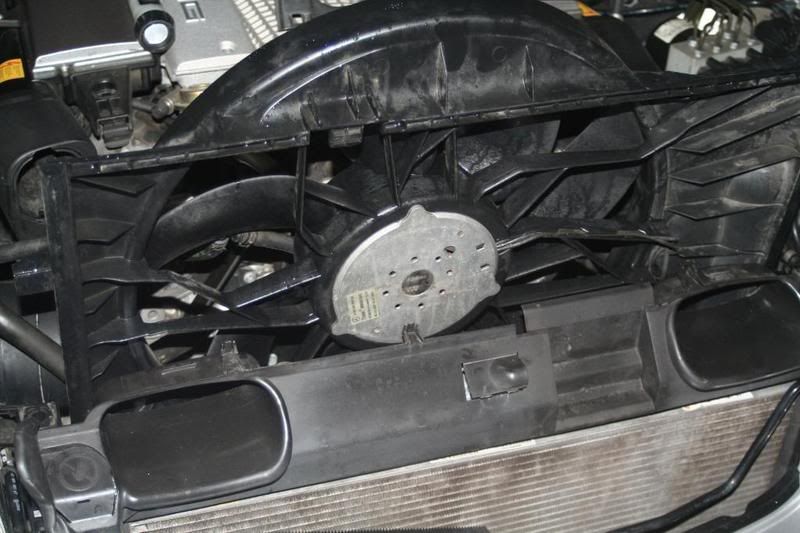
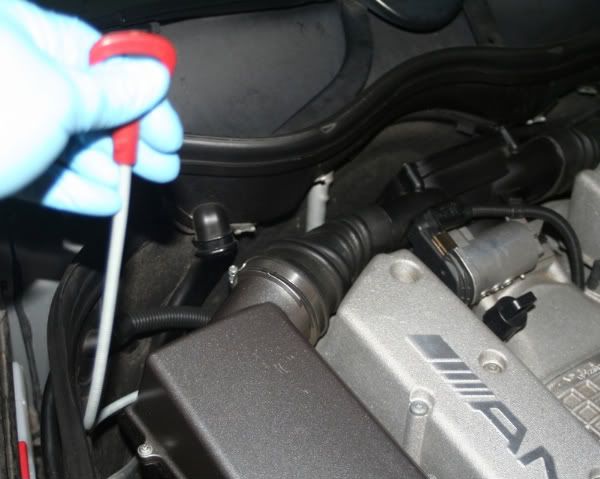
Raise and safely secure the car. Remove the undertray. Drain the radiator via the red petcock.
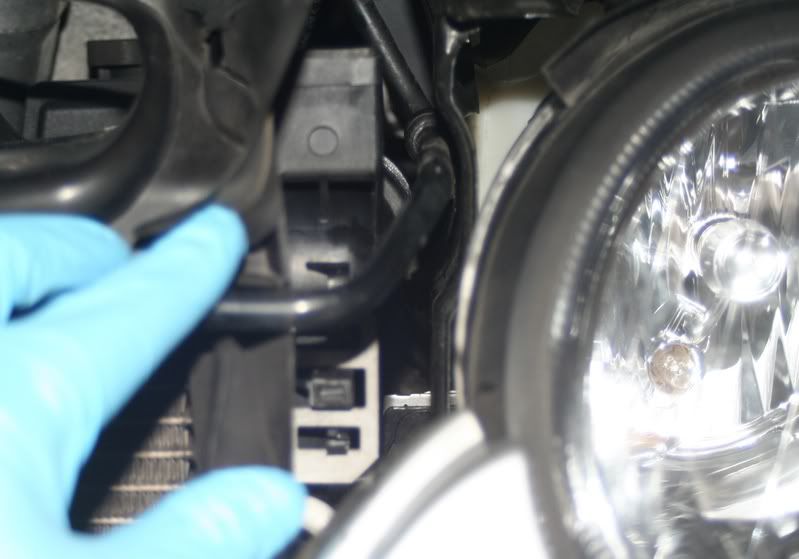
Remove the upper radiator support.
The horn mount is attached the rear of the bumper reinforcement. It will need to be unbolted in order to pull the support clear.
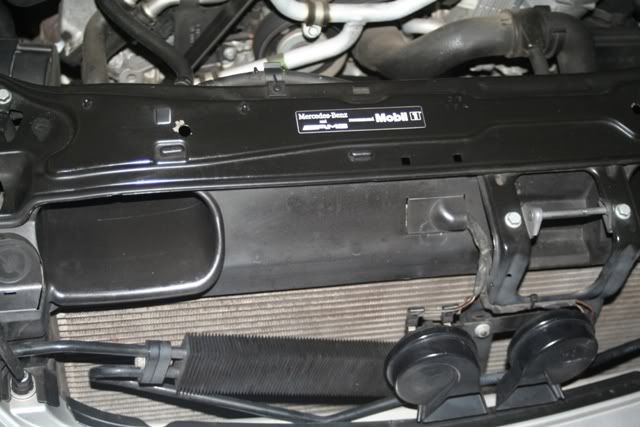
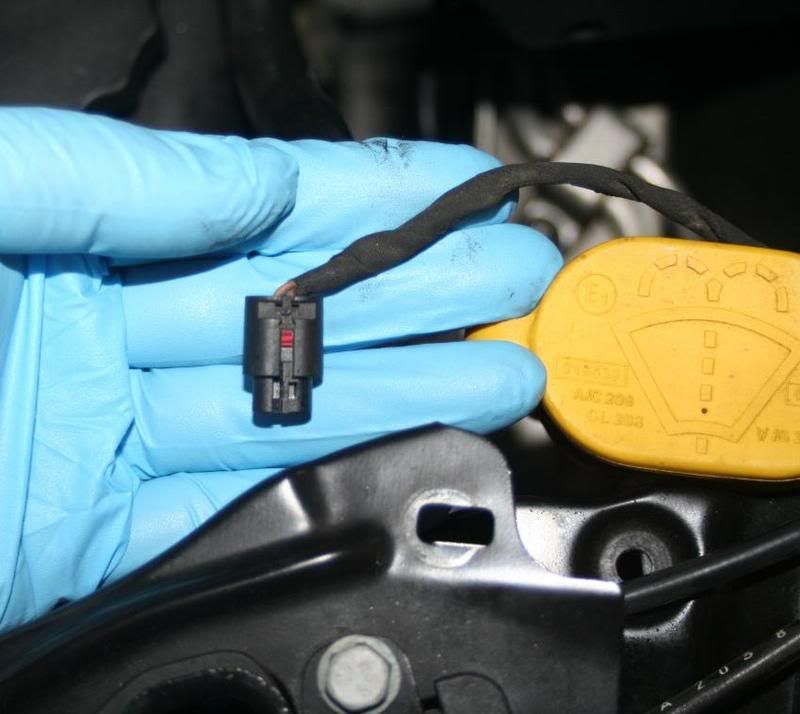
Disconnect the �hood open� sensor wiring.
There is no need to disconnect the hood latch cables.
Lay the radiator support assembly aside.
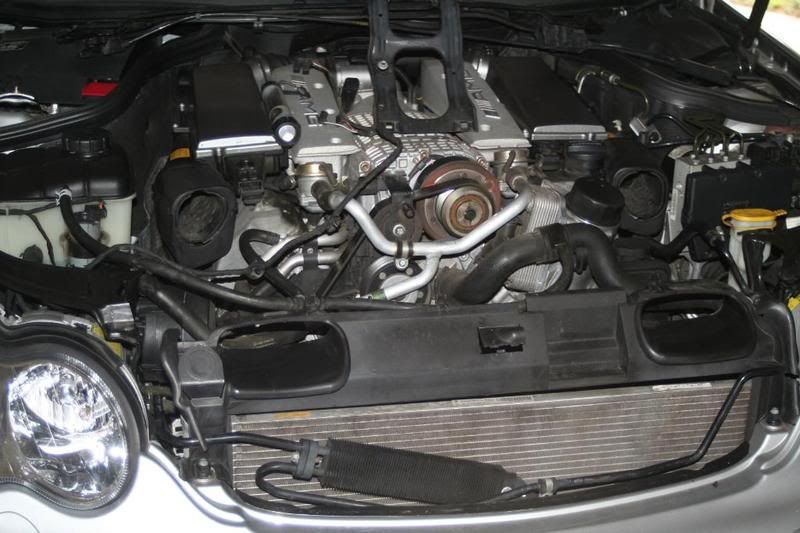
Disconnect the fan wiring. Pull the C clip retainers from the upper/lower coolant hoses and ATF tubes. Be prepared for additional fluid discharge.
Gently twist and pull the lines free from their attaching junctions.
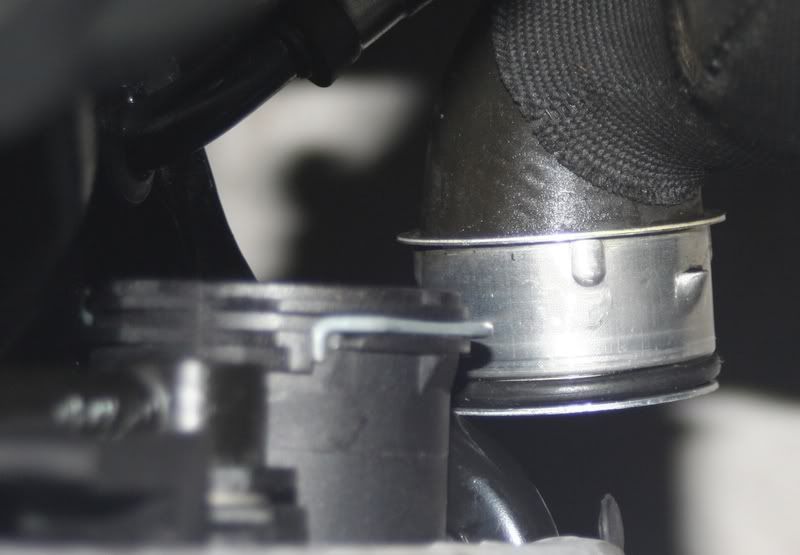
Squeeze, and then push the A/C condenser mounting T barb clips from the radiator.
Pull the radiator/cooling fan assembly up and out. Remove the fan while it�s on the workbench. There are two sprung plastic tabs that secure it to the radiator, in addition to the alignment sleeves.
Clean the sealing grooves and fit the new seals to the coolant hoses and ATF tubes.
&
Transfer the existing upper and lower rubber mounts to the new radiator. Lower it in place. Attach the hoses/tubes. Ensure that they are fully seated before snapping the C clips home.
Install the fan and reconnect its wiring.
Refill the reservoir with a 50/50 mixture of MB antifreeze and distilled water.
Check for leaks. Reinstall the upper support, its paraphernalia, and the undertray. Lower the car. Start the engine. Continue to add a 50/50 mix until the thermostat has opened. When the reservoir has been thoroughly purged of its residual air, install the cap.
Because our 722.6xx transmission is persnickety about its fluid level, that which was lost during the installation must be replenished. Remove the lock pin from the fill tube cap, and then the cap itself.
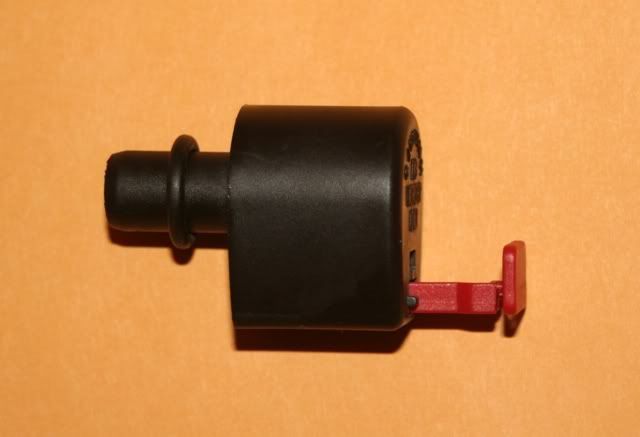
Disregard the 'workshop' admonition.
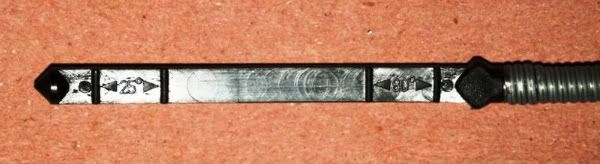
With the engine running and the transmission in Park, insert the ATF dipstick until it bottoms against the pan. The tool is unlike a conventional dipstick in that when it is measuring, the handle is not flush with the top of its tube.
If the fluid level is too low, estimate the amount that was sacrificed, and then replenish a like quantity. If it reads to at least the minimum mark, it�s time for a lengthy test drive to get everything up to proper temperature. Reinstall the cap. Get it to WOT several times to replicate real-world conditions.
The correct ATF level can only be properly established when the fluid is stabilized at 80 degrees Celsius. MB�s procedure nessecitates STAR DAS. Since I don�t have the scratch for that wonderful ~$15,000 machine, an infrared reading from the exterior of the transmission pan had to suffice.
Add ATF as required to achieve the proper level.
Verify the antifreeze level after several heating/cooling cycles to ensure all is as it should be.
Last edited by splinter; 01-28-2008 at 01:32 AM. Reason: part numbers
The following users liked this post:
purplecat001 (04-06-2017)

 01-28-2008, 02:25 PM
#14
MBWorld Fanatic!
Join Date: Apr 2003
Location: Socal
Posts: 2,175
Likes: 0
Received 0 Likes
on
0 Posts
EVE
01-28-2008, 04:30 PM
#16
MBWorld Fanatic!
It's posts like this that bring tears of joy to my eyes.
Excellent work.
Measure with the engine ON?
1st time I heard that.
Are you certain?
Excellent work.
Measure with the engine ON?
1st time I heard that.
Are you certain?
01-28-2008, 06:28 PM
#19
Newbie

Join Date: Jan 2008
Posts: 2
Likes: 0
Received 0 Likes
on
0 Posts
2001 C200K Avantgarde
Great DIY Splinter!
Please could you help me with a few questions on this W203 radiator topic......
Was the radiator replaced due to the Valeo ATF/Glycol problem?
Do you know the actual manufacturer of the new MB radiator in your photo?
(ie. Is it a Behr or later type Valeo perhaps?)
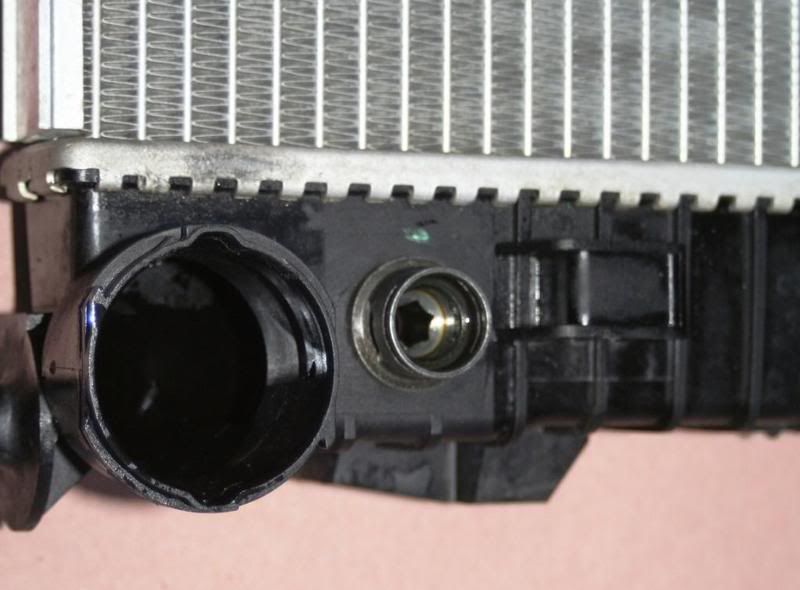
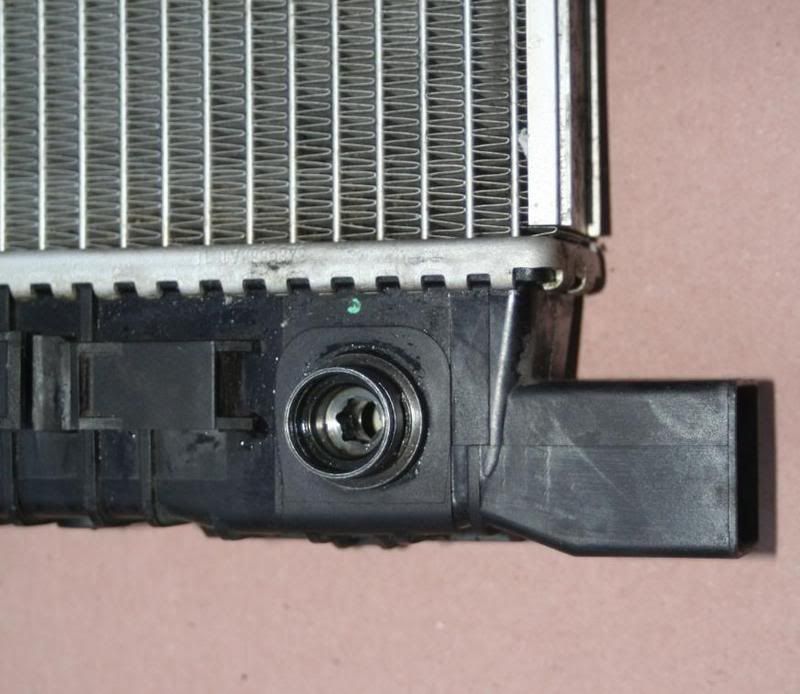
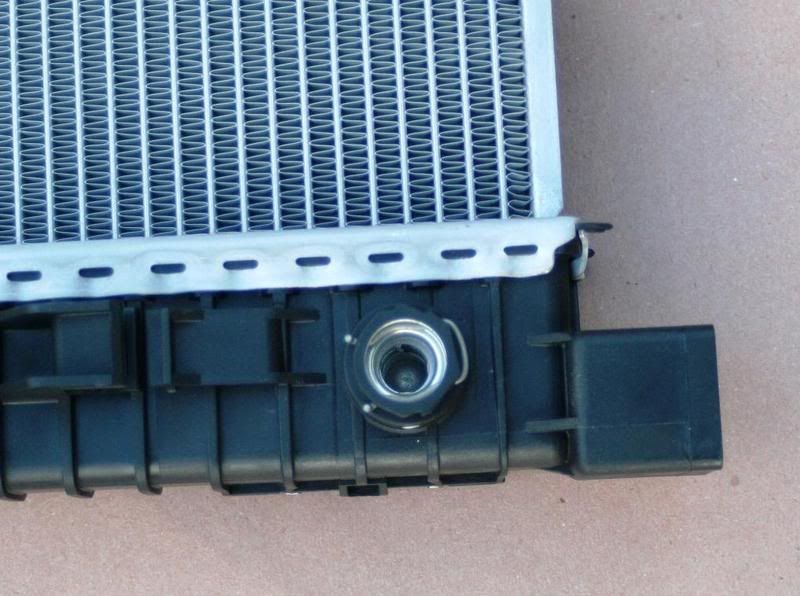
The wavy silver metal crimping around the black plastic rad end tank in your photo is exactly the same as on the rad currently fitted to my German built 2001 C200K in the UK. I have been trying to find out how the dealers identify the suspect Valeo rads as the Mercedes TSB pictures (figure 2 & 3) suggests it is by looking for the square notched type of end tank crimping?
If you still have the old radiator could you post a photo of the end tank crimping, especially if it is one of the suspect Valeo?
Thanks again for your help and great DIY.
(Some photos attached for ref from other posts on this subject)
Please could you help me with a few questions on this W203 radiator topic......
Was the radiator replaced due to the Valeo ATF/Glycol problem?
Do you know the actual manufacturer of the new MB radiator in your photo?
(ie. Is it a Behr or later type Valeo perhaps?)
The wavy silver metal crimping around the black plastic rad end tank in your photo is exactly the same as on the rad currently fitted to my German built 2001 C200K in the UK. I have been trying to find out how the dealers identify the suspect Valeo rads as the Mercedes TSB pictures (figure 2 & 3) suggests it is by looking for the square notched type of end tank crimping?
If you still have the old radiator could you post a photo of the end tank crimping, especially if it is one of the suspect Valeo?
Thanks again for your help and great DIY.
(Some photos attached for ref from other posts on this subject)
 01-29-2008, 12:08 AM
#21
Super Moderator
Thanks gentlemen.
The OE Valeo prompted the swap. I sent a sample of ATF to Blackstone Laboratories for Glycol contamination testing. It came back positive, albeit with only trace amounts. Along with the new radiator, all of the ATF was replaced and a new filter was installed. It was far less expensive than having to replace the transmission and torque converter had the contamination worsened.
C230 Sport Coup- I sent you a copy of the fluid level verification procedure from MB�s service DVD. Let me know if you didn�t receive it.
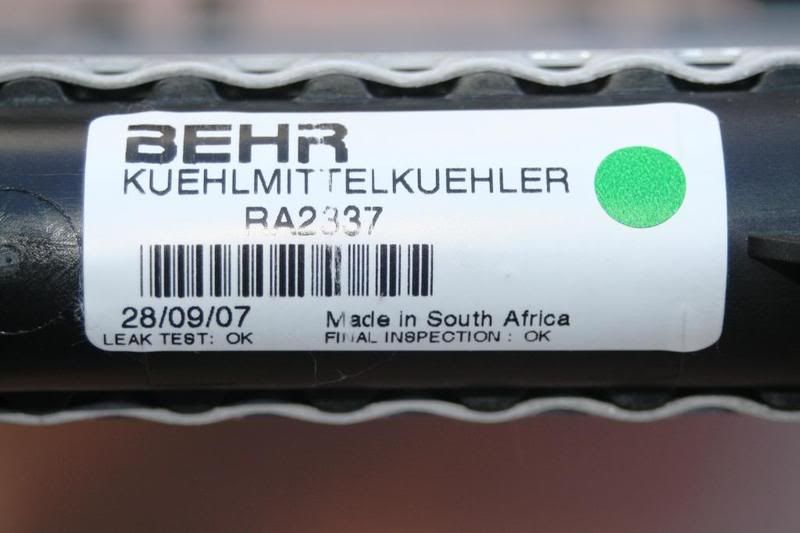
mab01uk- The TSB is lacking in its clarity. It merely reinforced for me that it�s a known problem of which MB is well aware. They have spent a goodly sum rectifying the failures under warranty. That picture showing the Behr sticker is actually on the A/C condenser. Ironically, my condenser and heat exchanger were supplied by Behr. Only the radiator was from Valeo. Please be aware that not all of the Valeos have proven to be defective. In fact, many are not. There are several on the forum with nary a problem. Perhaps you�ll consider having your fluid tested to verify if indeed contamination exists. If you find that to be the case, exchange it posthaste.
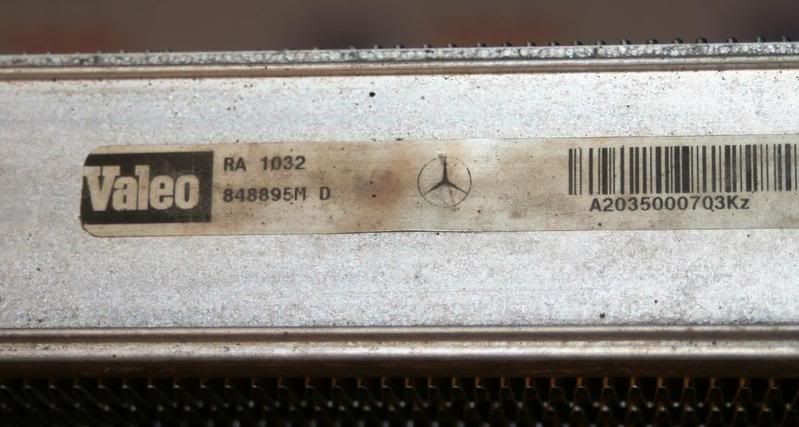
Valeo
Valeo
Behr
Behr

The OE Valeo prompted the swap. I sent a sample of ATF to Blackstone Laboratories for Glycol contamination testing. It came back positive, albeit with only trace amounts. Along with the new radiator, all of the ATF was replaced and a new filter was installed. It was far less expensive than having to replace the transmission and torque converter had the contamination worsened.
C230 Sport Coup- I sent you a copy of the fluid level verification procedure from MB�s service DVD. Let me know if you didn�t receive it.
mab01uk- The TSB is lacking in its clarity. It merely reinforced for me that it�s a known problem of which MB is well aware. They have spent a goodly sum rectifying the failures under warranty. That picture showing the Behr sticker is actually on the A/C condenser. Ironically, my condenser and heat exchanger were supplied by Behr. Only the radiator was from Valeo. Please be aware that not all of the Valeos have proven to be defective. In fact, many are not. There are several on the forum with nary a problem. Perhaps you�ll consider having your fluid tested to verify if indeed contamination exists. If you find that to be the case, exchange it posthaste.
Valeo
Valeo
Behr
Behr
01-29-2008, 01:30 AM
#22
MBWorld Fanatic!
You da man, splinter!!!!! Thank you for finally shedding some clarity on one of our (at least mine) biggest fears. And judging by those fine pics you've posted, it looks like I can rest easy on this issue (my radiator has the wavy crimp on the endtanks - yippie!!).
01-29-2008, 01:46 AM
#23
MBWorld Fanatic!

Join Date: Jan 2005
Location: Orange County
Posts: 2,848
Likes: 0
Received 15 Likes
on
15 Posts
2005 C Wagon (No snickering please!)
One of the best write up I've seen. Great job with clear up close pictures, and listing tools and expendables. Better than the WIS.
Tell me, now that you have that South African radiator installed, can your car speak Afrikans?
Tell me, now that you have that South African radiator installed, can your car speak Afrikans?
01-29-2008, 02:08 AM
#24
MBWorld Fanatic!
Join Date: Apr 2003
Location: Socal
Posts: 2,175
Likes: 0
Received 0 Likes
on
0 Posts
EVE
What the, I can't even tell the wavy crimps in that picture...
01-29-2008, 02:25 AM
#25
MBWorld Fanatic!
Join Date: Jan 2006
Location: Pasadena, CA
Posts: 3,206
Likes: 0
Received 6 Likes
on
5 Posts
2002 C230K, 2013 BMW 328, 2015 BMW X5
Splinter,
I took the time to go to the Blackstone site, and I read what is possibly one of the best stories I have ever read.
http://www.blackstone-labs.com/tales...oily_side.html
Awesome read about how and why the guy started his business. Awesome read!
E
I took the time to go to the Blackstone site, and I read what is possibly one of the best stories I have ever read.
http://www.blackstone-labs.com/tales...oily_side.html
Awesome read about how and why the guy started his business. Awesome read!
E


